

Micro:Bit Temperature Display Tutorial
Tutorial Aim:
To display a TMP36 temperature sensor reading on a Robot:Bit v2 by continuously polling every 10 seconds and converting the analog reading from the temperature pin to Celsius using:
temp(Celsius) = (voltage - 500) / 10
Requirements:
This tutorial makes use of the Micro:bit Electronics Learning Package
Pin Layout:
| Micro:Bit Pins: | Sensor Pins: |
| GND | GND |
| 3.3V | VCC |
| 0 | OUT |
Setup:
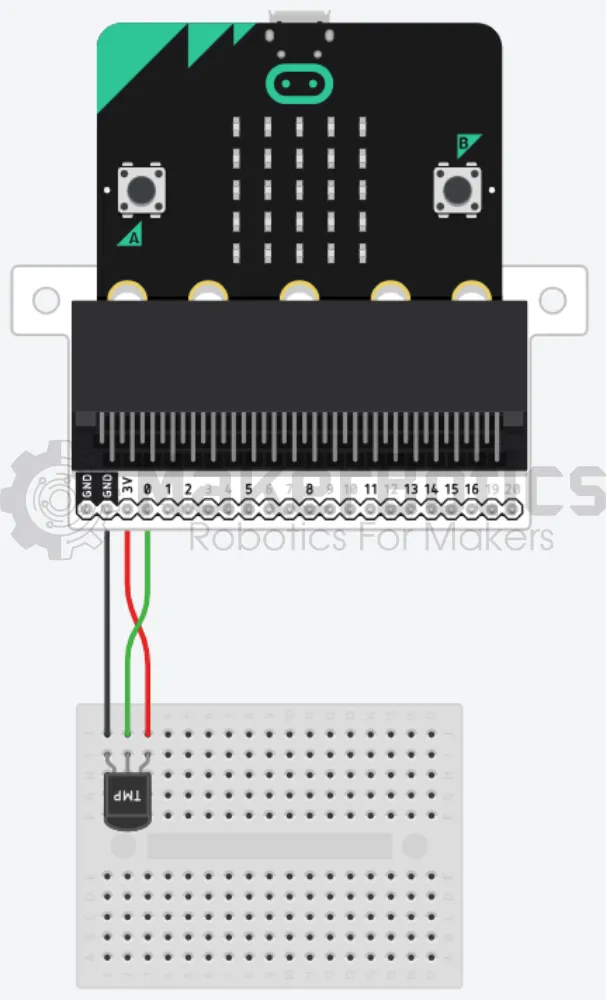
Please refer to the diagram below for wiring. Please note that the circuit diagram uses a different Micro:bit shield than the supplied in our package, despite this, the wiring is the same.
- Place the TMP36 temperature sensor on the breakout board and use the FM jumper wires to connect it to pin 0 on the Micro:bit
- Open Microsoft Makecode
- Plug in the Micro:bit to the computer
Code Walk Through:
Calculating the voltage from the analog output:
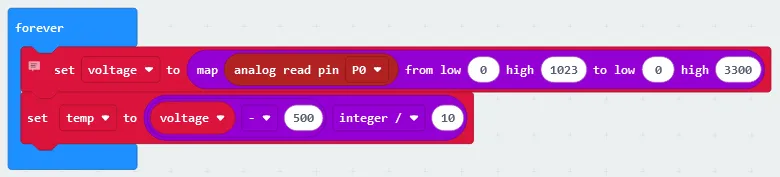
The voltage can be calculated from the sensor's analog output by mapping from the analog range 0 - 1023 to the millivolt range 0 - 3300. The code for this section will go inside the ‘forever’ block.
- Retrieving the temperature sensors analog output: Select “analog read pin (pin number)” in the Pins tab in the Advanced section and change the pin number to P0
- Mapping the analog Value: In the math tab choose “map (value) from low (value) high (value) to low (value) high (value) and change the values such that it maps the reading from pin 0 from 0 to 1023 and 0 to 3300; “map analog read pin P0 from low 0 high 1023 to low 0 high 3300”.
- Creating a variable for the voltage: Select “Make a Variable” in the Variable tab and naming it “voltage”
- Setting ‘voltage’ to the mapping calculation: Choose “set (variable name) to (value)” in the Variable tab, change variable name to voltage and place the “map analog read pin P0 from low 0 high 1023 to low 0 high 3300” block as the value

Calculating the temperature:
We can use the fact that as the temperature increases, the voltage across the diode does as well at a known rate. The formula used is millivolts - 500 / 10. The code for this section will go inside the ‘forever’ block.
- Creating a temperature variable: Select the “Make a Variable” in the Variable tab and naming it “temp”
- To calculate the temperature :
- In the Math tab choose the “(value) - (value)” block, and change the values such that the expression becomes “voltage - 500” where the voltage variable can be found in the Variables tab
- Select the “(value) / (value)” block, and change the values such that the expression becomes voltage - 500 / 10 by placing the previous math expression inside this block
- Setting the temperature variable: In the Variables tab choose the “set (variable name) to (value)”, change the variable name to temp and value to the formula code block
Displaying the temperature on the LED grid:
We can show the calculated temperature on the LED grid by pausing the code for a specified amount of time so that the micro:bit has enough time to display the temperature before executing the next action.The code for this section will go inside the ‘forever’ block.
- Rounding the temperature to a few decimal places: In the Math tab, select “round 0” and place the variable temp (can be found in the Variables tab) inside the code snippet
- Displaying the temperature: In the basic tab select “show number”, and drag the “round temp” line inside the code
- Pausing the code: Select “pause ms” in the Basic tab and setting it to 1000 (1 second)

Flashing the code onto the Micro:Bit:
- Make sure the Micro:Bit is connected to the computer
- On the bottom left corner, click the “Download” button and follow the prompts
Python Code:
Simulated Temperature Display:
Downloadable Content:
Please find this tutorial's python & hex file for microsoft makecode on our Github.
Credits:
- Microsoft
- The Micro:bit Community
- The STEM Community