

Micro:Bit RBG LED Module Colour Cycle Tutorial
Tutorial Aim:
To cycle through all colours available on the RBG LED module by adjusting the red, green and blue led output level.
Requirements:
This tutorial makes use of the Micro:bit Electronics Learning Package
Pin Layout:
| Micro:Bit Pins: | Sensor Pins: |
| GND | GND |
| 12 | Red (R) |
| 13 | Green (G) |
| 14 | Blue (B) |
Setup:
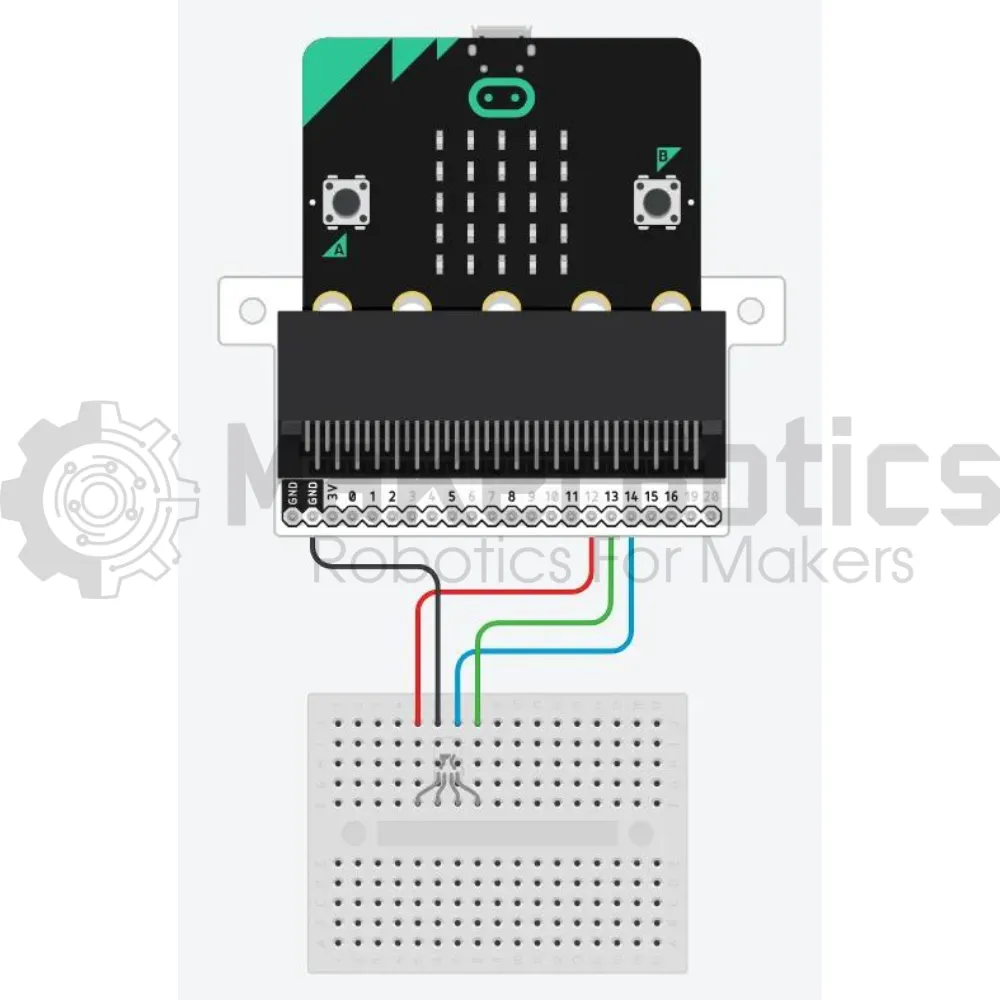
Please refer to the diagram below for wiring. Please note that the circuit diagram uses a different Micro:bit shield than the supplied in our package, despite this, the wiring is the same.
- Connect the RBG LED module to the Micro:bit by attaching the red pin to pin 12, green pin to pin13 & blue pin to pin 14 on the Micro:bit
- Open Microsoft Makecode
- Plug in the Micro:bit to the computer
Code Walk Through:
Turning off the led’s:
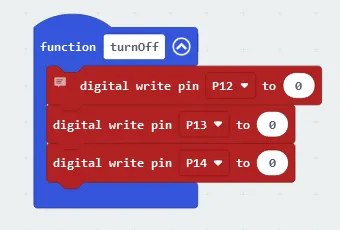
Creating a function that turns off all of the led colours.To turn off an led colour, we need to send an off signal (digital write pin to 0) to its corresponding pin. The code for this section will go inside the “turnOff” function block.
- Creating the “turnOff” function: Under the Advanced section, in the Functions tab select “Make a Function” & name it “turnOff”
- Turning off the red led pin: in the Pins tab select “digital write pin P0 to 0” and change P0 to P12
- Turning off the other colours: Repeat the above step twice, changing the pins to P13 & P14
Changing the led colour:
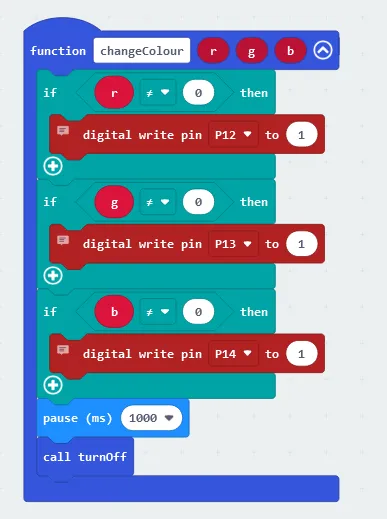
Creating a function that turns specific colours on & off. A colour is turned on if we send an ‘on’ signal (digital write pin to 1) to its corresponding pin. The 3 parameters “r” for red, “g” for green & “b” for blue, can be 1 if we want to turn on that colour, or 0 if we want to turn that colour off. The code for this section will go inside the ‘changeColour’ function.
- Creating the ‘changeColour’ function: Under the Advanced section in the Functions tab select “Make a Function” & name it “changeColour”. Add 3 number parameters called “r”, “g” & “b”
- To check which colours will be turned on: Select the if conditional block in the Logic tab and place it in the changeColour function
- To check if a colour is not off (hence turned on): Select the “0 = 0” line in the Logic tab, change it to “r ≠ 0” & place the comparison line inside the if statement.
- To update the module if the colour is turned on: Select “digital write pin P0 to 0” in the Pins tab (in the Advanced section), change it to “digital write pin P12 to 1” & place the code snippet underneath the if statement inside the conditional block
- To check & update the other colours: Create two more logic conditional blocks in the function using the above steps for the conditions:
- “g ≠ 0” and place “digital write pin P13 to 1” underneath the conditional statement
- “b ≠ 0” and place “digital write pin P14 to 1” underneath the conditional statement
- To pause the running code and display the colours for a specified amount of time: select “pause (ms)” in the Basic tab & set it to 1000
- To turn off all the colours: In the Functions tab select “call turnOff” and place it last inside the changeColour function
Cycling through all colour combinations:
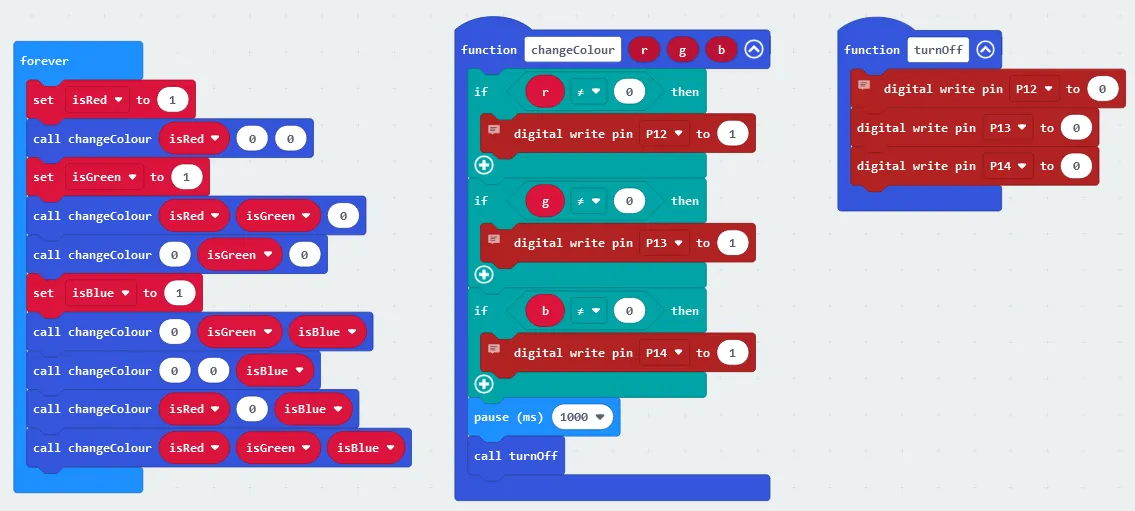
To cycle through all the combinations we’ll need to be changing which colours pins are on & off using the changeColour function. For simplicity, we’ll create 3 variables -”isRed”, isGreen” & “isBlue”- to keep track of which colours we’ll be turning on & off. The code for this section will go inside the ‘forever’ block.
- Creating the variables: In the Variables tab select “Make a Variable” & name the variables ‘isBlue’, ‘isRed’, ‘isGreen’.
- Turning the variables “on”: Select “set (variable name) to 0)” in the Variables tab, change the variable to name to isRed/isGreen/isBlue and the 0 to 1 for all 3 variables.
- To make the led red: Select “call changeColour 1 1 1” in the Functions tab, place the variable isRed (found in the Variables tab) in the function call so that it becomes “call changeColour isRed 0 0”
- Repeat this step for each colour so that the function calls inside the ‘Forever’ block would be:
- Yellow: call changeColour isRed isGreen 0
- Green: call changeColour 0 isGreen 0
- Light Blue: call changeColour 0 isGreen isBlue
- Blue: call changeColour 0 0 isBlue
- Purple: call changeColour isRed 0 isBlue
- White: call changeColour isRed isGreen isBlue
Note: Be careful where you place the variables, as the first parameter is for the red pin, second is for the green pin and third is for the blue pin, placing the variable ‘isBlue’ as the first or second parameter will result in a different colour than expected.

Flashing the code onto the Micro:Bit:
- Make sure the Micro:Bit is connected to the computer
- On the bottom left corner, click the “Download” button and follow the prompts
Block Code:
Python Code:
Simulated Colour Cycle:
Downloadable Content:
Please find this tutorial's python & hex file for microsoft makecode on our Github.
Credits:
- Microsoft
- The Micro:bit Community
- The STEM Community