

Micro:Bit NeoPixel Display Tutorial
Tutorial Aim:
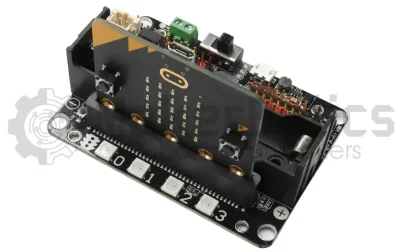
The goal of this tutorial is to interface the micro:bit microcontroller with the KittenBot Robotbit shield to control its RGB LED array.
The RGB LED array will each cycle through a range of colours. In future programming, these can be used for displaying the status of the program or function. Microsoft MakeCode will be used to program the system.
Requirements:
- Microsoft MakeCode for micro:bit
- micro:bit V2.2 with USB Type A to micro USB cable
- KittenBot Robotbit shield
Setup:
The RGB Array to be programmed is shown below. It is accessed internally using the micro:bit pin 16. The LEDs will cycle through a range of colours from left to right (from LED 0 – 3).
- The micro:bit simply plugs directly into the Expansion Shield as shown in the image below.
- Open Microsoft Makecode in your preferred web browser.
- Plug in the Micro:bit to the computer using a Type A to micro-USB cable.
Code Walk Through:
Initializing & configuring the RGB LED array:
To initialize & configure the RGB LED array to our micro:bit we need the robotbit extension by kittenbot. This extension will allow us to access & manipulate the RGB LEDs associated with a specified pin (pin 16). The code for this section will go inside the 'on start block'.
For more information about the extension: https://makecode.microbit.org/pkg/kittenbot/pxt-robotbit
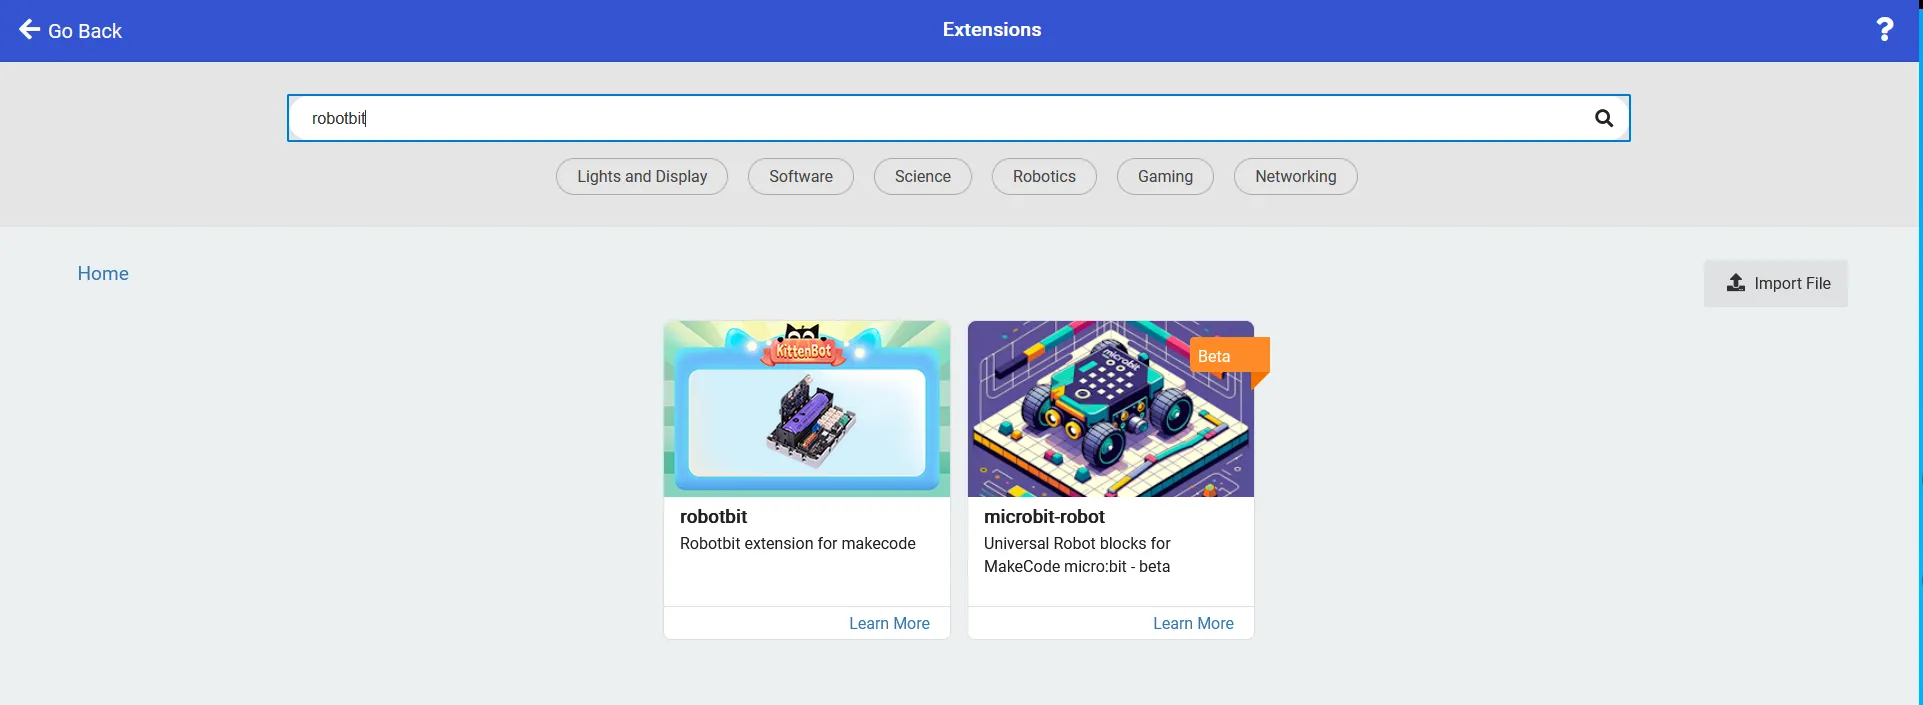
- Adding the extension: In the extensions tab, search & select the robotbit extension by kittenbot shown above.
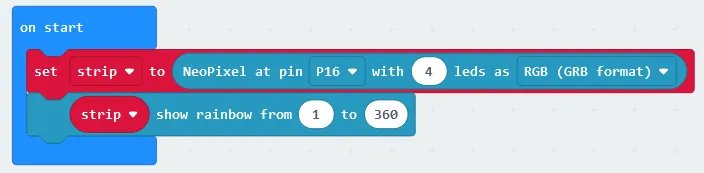
- Initializing the neopixel strip: In the neopixel tab select “set strip to NeoPixel at pin 0 with 24 leds as RGB format” & change it to “set strip to NeoPixel to pin P16 with 4 leds ad RGB (GRB format)” using the drop down box.
- Calibrating the leds to cycle through a rainbow pattern: In the Neopixel tab, select “strip show rainbow from 1 to 360” as shown in the image below.
Displaying & rotating the rainbow pattern on the LEDs:
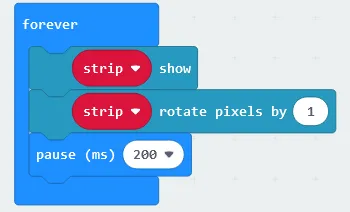
We can tell the neopixel strip to cycle through the rainbow pattern by rotating the pixels by 1, and display each colour pattern for a specified amount of time by pausing the code from running the next iteration. The code for this section will go in the 'forever' block.
- Updating the LEDs with the new data & displaying the colours on the LEDs: In the Neopixel tab, select “strip show”
- Rotate the colours by 1 on the LED display: In the Neopixel tab, select “strip rotate pixels by 1”
- Pause the loop: In the basic tab, select “pause (ms) 100” and change the pause to 200ms.
Flashing the code onto the Micro:Bit:
- Make sure the Micro:Bit is connected to the computer
- On the bottom left corner, click the “Download” button and follow the prompts
def on_forever():
    if pins.digital_read_pin(DigitalPin.P8) == 1:
        basic.show_icon(IconNames.STICK_FIGURE)
        music.play(music.builtin_playable_sound_effect(soundExpression.mysterious),
            music.PlaybackMode.UNTIL_DONE)
    else:
        basic.show_leds("""
            . . . . .
            . . . . .
            # # # # #
            . . . . .
            . . . . .
            """)
    basic.pause(500)
basic.forever(on_forever)
Program Code:
Block Code:
Microsoft Makecode displays the code in 2 formats; the Blockcode we generated earlier as well as the Python Code. These can be seen below for your reference.
Python Code:
Neopixel Simulation
After flashing the program the code will run continuously. See below for the end result!
Tips and Tricks:
The KittenBot Robotbit shield accepts an 18650 battery. Connect the battery and run the neopixel display without connecting via a USB cable!
Downloadable Content:
Please find this tutorial's python & hex file for Microsoft MakeCode on our Github page.
Credits:
- Microsoft
- The micro:bit Community
- The STEM Community