

Micro:Bit Distance Measurement Tutorial
Tutorial Aim:
The aim of this tutorial is to demonstrate how to measure and display the distance in centimetres from an A02YYUW ultrasonic sensor using the speed of sound formula:
Distance (cm) = ((high pulse time length/1000)/2) * 0.343
This tutorial will guide users on how to calculate the distance based on the time taken for an ultrasonic pulse to travel to an object and back, applying the speed of sound in air to convert time into distance. Users will learn how to interface with the A02YYUW sensor, interpret the sensor’s output pulse length, compute the distance, and display the result on the microbit display.
Requirements:
This tutorial makes use of the Micro:bit Electronics Learning Package.
Pin Layout:
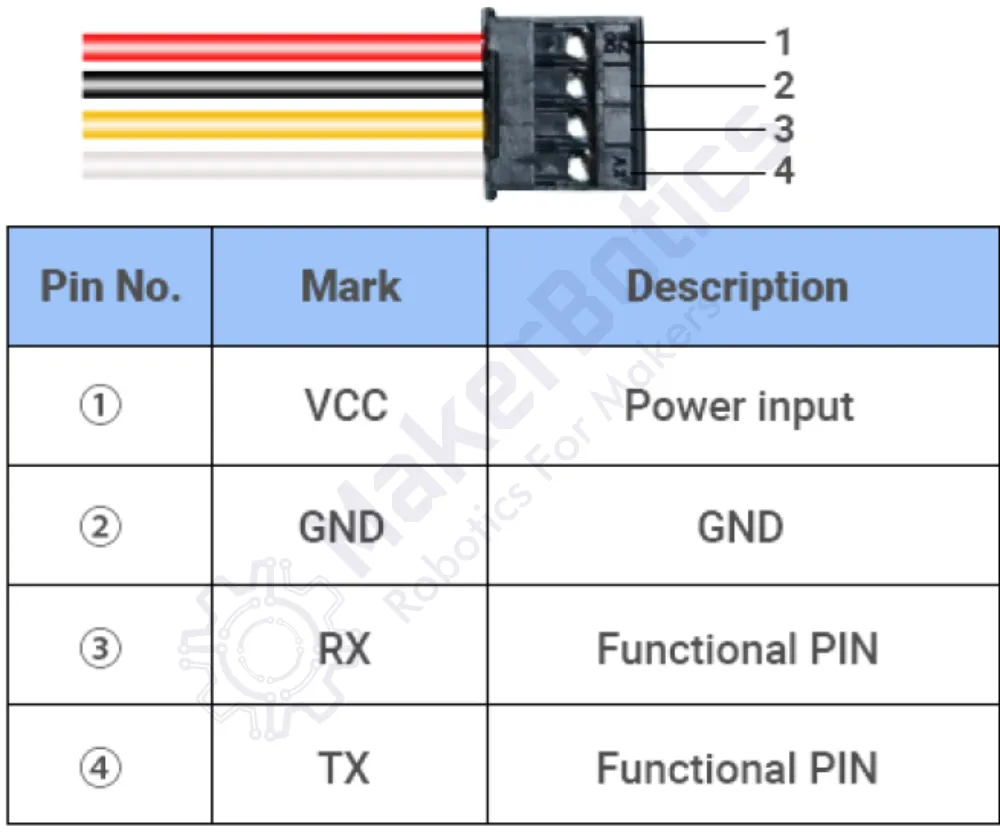
| Micro:Bit Pins: | Sensor Pins: |
| GND | GND |
| 3.3V | VCC |
| 12 | Echo (TX) |
| 8 | Trig (RX) |
Setup:
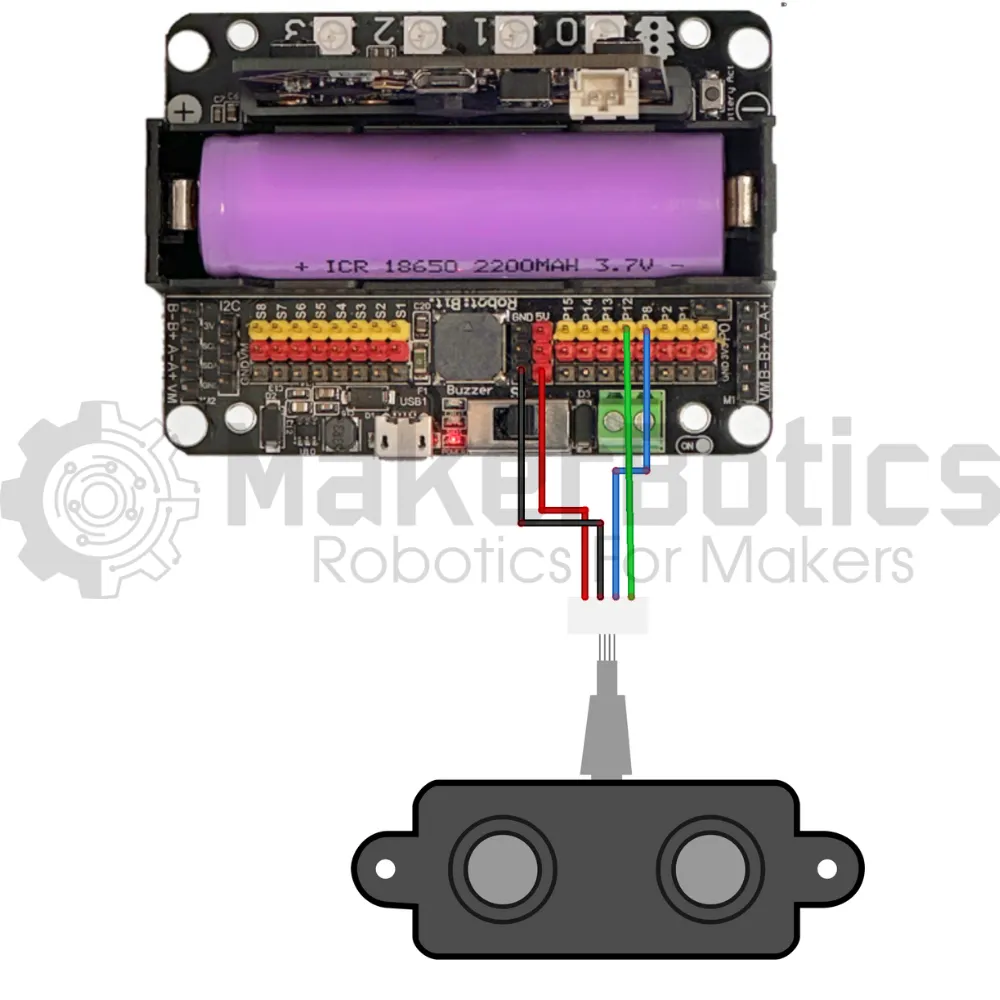
Please refer to the diagram below for wiring.
- Connect the A02YYUW sensor’s echo pin to pin 12 & trig pin to pin 8 on the Micro:Bit using the FF jumper wires
- Open Microsoft Makecode
- Plug in the Micro:bit to the computer
Code Walk Through:
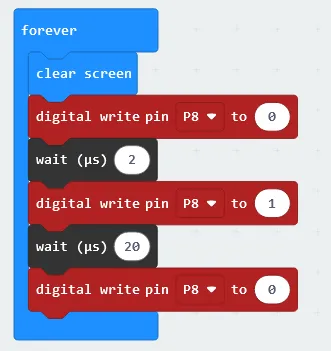
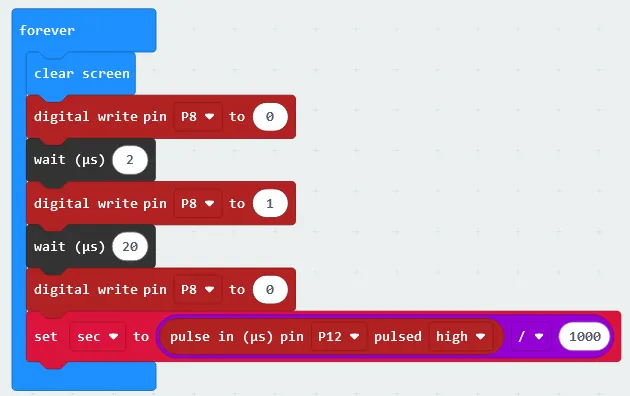
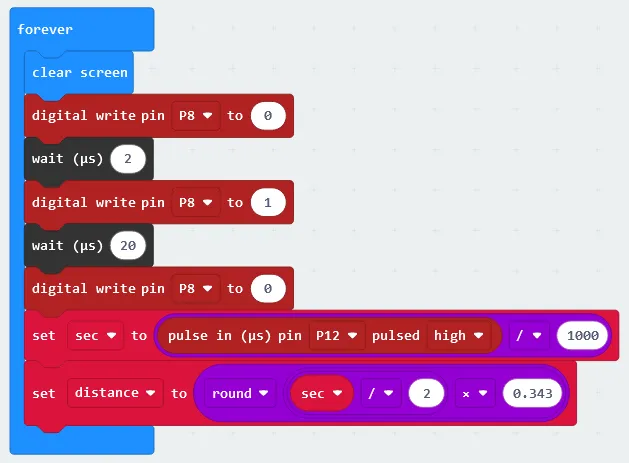
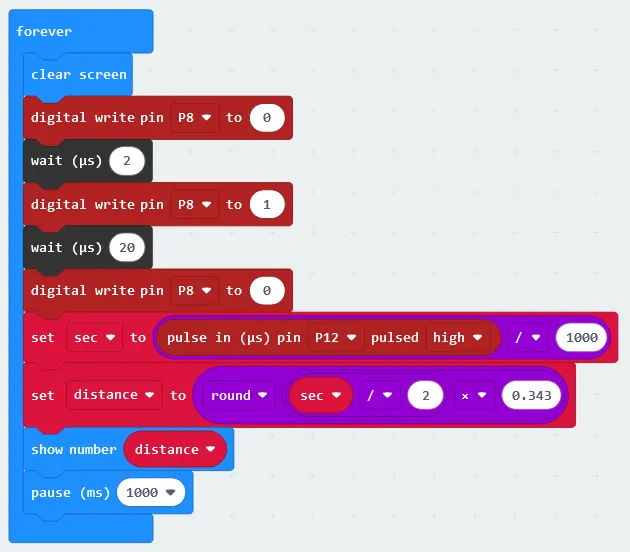
Triggering an ultrasonic pulse:
We can trigger an ultrasonic pulse by setting the ultrasonic sensor's trigger pin to 1. The code for this section will be inside the ‘forever’ block.
- Clearing the LED grid: In the Basic tab select “clear screen”.
- Turning off the trigger pin: Under the Advanced section in the Pins tab select “digital write pin (pin number) to 0” and choose the pin number to be P8 using the dropdown box.
- Making the program wait for the pin to receive the off signal: Under the Advanced section in the Control tab, select “wait (microseconds)” and set it to 2.
- Trigger an ultrasonic pulse: Under the Advanced section in the Pins tab & select “digital write pin P8 to 1”.
- Making the program wait for the ultrasonic pulse: Under the Advanced section in the Control tab & select “wait (microseconds)” and set it to 20.
- Deactivating the ultrasonic pulse: Under the Advanced section in the Pins tab select “digital write pin (pin number) to 0” and choose the pin number to be P8 using the dropdown box.
Measuring the pulse length:
The pulse length is divided by 1000 so that the measurement is in seconds and not microseconds, and then again by 2 as the pulse is sent to the target and then back again.The code for this section will be inside the ‘forever’ block.
- Creating the variable “sec” to store the pulse length: In the Variables tab select “Make a Variable” and name it “sec”
- Calculating the pulse length in seconds: In the Math tab select “0 / 0” & change it to “pulse in pin P12 pulsed high / 1000”. The “pulse in pin (pin number) pulsed high” can be found in more section of the Pins Tab under Pulse
- Storing the pulse length: In the Variables tab select “set sec to (number)” & set it to the math expression we created by dragging it inside the code snippet.
Measuring the distance:
We can determine the distance to a target by measuring time lapses between the sending and receiving of the ultrasonic pulse. The pulse length is multiplied by the speed of sound constant to arrive at the target's distance. The code for this section will be inside the ‘forever’ block.
- Creating the variable “distance” to store the distance calculation: In the Variables tab select “Make a Variable” & name it “distance”.
- Calculating the distance: In the math tab select -
- “0 / 0” & change it to “sec / 2” (sec can be found in the Variables tab)
- “0 x 0” & change it to “sec / 2 x 0.343”
- “Round (number)” & change it to “round sec / 2 x 0.343” by dragging the previous math expression inside the code line
- Setting the distance variable: In the Variable tab select “set distance to (number)” & set it to the distance calculation by dragging the math expression inside the code line.
Displaying the distance:
The code must be paused for a specified amount of time so that the distance can be displayed on the LED grid before the micro:bit executes the next task.
- Displaying the distance: In the Basic tab select “show number” and set it to the variable distance.
- Pausing the code: In the Basic tab select “pause (ms)” and set it to 1000 (1 second).
Flashing the code onto the Micro:Bit:
- Make sure the Micro:Bit is connected to the computer
- On the bottom left corner, click the “Download” button and follow the prompts
Python Code:
Entire python code for the tutorial:
Results
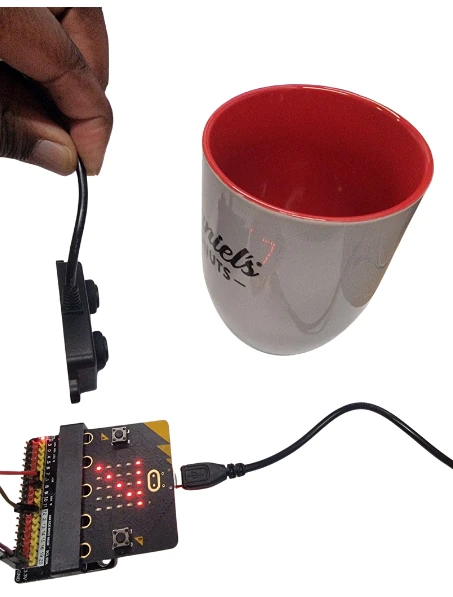
Hold the sensor some distance from an object, in this case, a cup and take a reading. The reading will be displayed on the screen.
Downloadable Content:
Please find this tutorial's python & hex file for Microsoft MakeCode on our GitHub.
Credits:
- Microsoft
- The Micro:bit Community
- The STEM Community