

Micro:Bit Button Control Fan Speed Tutorial
Tutorial Aim:
The aim of this tutorial is to demonstrate how to control a fan’s speed using the micro:bit's A and B buttons. Specifically, pressing button A will increase the fan speed, while pressing button B will decrease the fan speed. This project will teach users how to handle button inputs to adjust the fan speed in discrete steps, giving a simple manual way to control motor power without an analog input device like a potentiometer.
Requirements:
This tutorial makes use of the Micro:bit Electronics Learning Package.
Pin Layout:
| Micro:Bit Pins: | Transistor: |
| 0 | Base |
| GND | Emitter |
| DC Motor Pin: GND | Collector |
| Micro:Bit Pins: | 5V DC Motor: |
| 3.3V | VCC |
| Transistor Pin: Emitter | GND |
Setup:
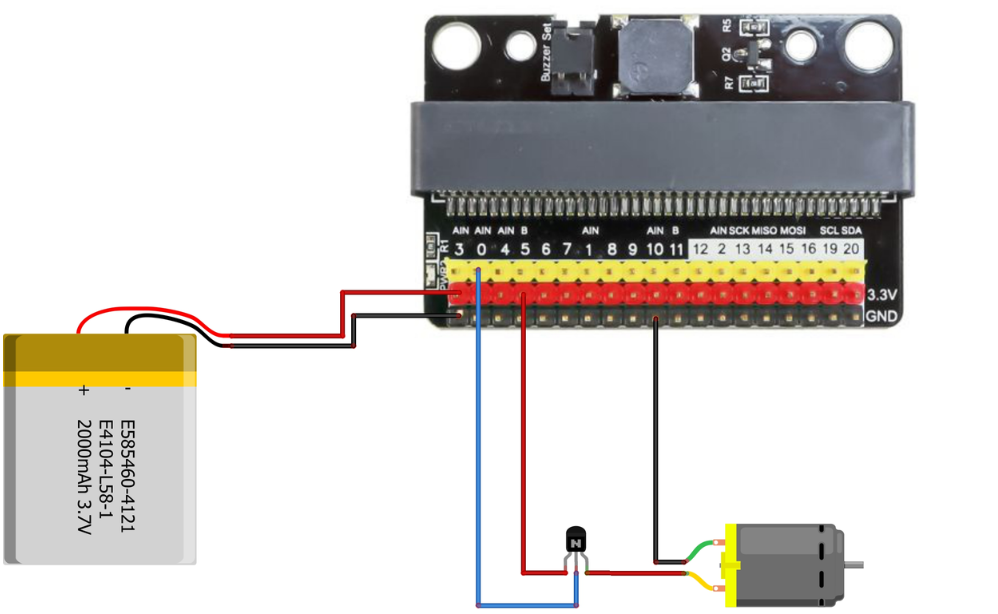
- Place the transistor on the breakout board connect it to pin 0 on the Micro:Bit using the FM jumper wires
- Place the soft leaf fan on the 5V DC motor and connect it to the transistor on the breadboard
- Open Microsoft Makecode
- Plug in the Micro:bit to the computer
Please refer to the wiring below.
Code Walk Through:
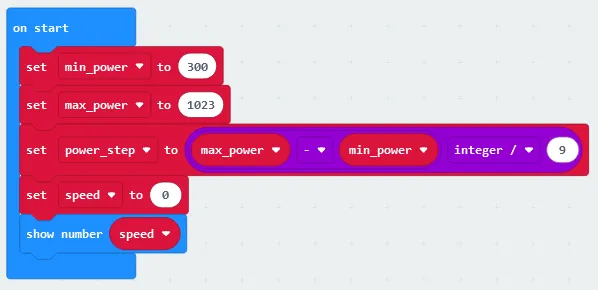
Setting the min/max power output & power output difference for each speed level:
The 5V DC motor's input dictates the amount of volts that will be used to power it, with 0 being no power & 1023 being the maximum power. We can use this to determine how much to increment the power with each level by dividing the max power - min power by the desired number of speed levels (9 levels): (1023-300) ÷ 9. The code for this section will go inside the ‘on start’ block.
- Creating the minimum power variable: In the Variables tab select “Make a Variable” and name it min_power, then select the “set min_power to (number)” & change the number to 300
- Creating the maximum power variable: Repeat the above step with the variable name “max_power” and value 1023.
- Creating the speed variable: Repeat the above step with the variable name “speed” and value of 0.
- Calculating the level power increase variable: In the Math tab select the “0 - 0” line, change it to “max_power - min_power” by placing the variable names inside the line (variable names can be found in the Variables tab), then select “0 / 0” in the Math tab and change it to “max_power - min_power / 9” by dragging the subtraction code inside the code snippet.
- Creating the power increase variable: Create a new variable named “power_step” and set it to the math expression we created above.
- Displaying the speed: In the basic tab select “show number”, and change it to “show speed”.
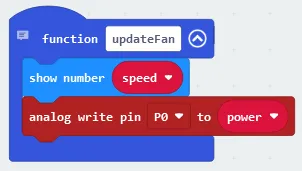
Updating the fan speed:
We can create a function that when called will display the current speed on the micro:bits LED grid & send the current power level to the motors pin, changing the fan speed.The code for this section will go inside the ‘updateFan’ function block.
- Creating the function: Under the Advanced section in the Functions tab, select “Make a Function” and name is updateFan.
- Displaying the speed: In the basic tab select “show number”, and change it to “show speed”.
- Changing the motor’s power input: Under the Advanced section in Pins, select “analog write pin (pin number) to (number) and change it to “analog write pin P0 to power” (the power variable can be found in the Variables tab).
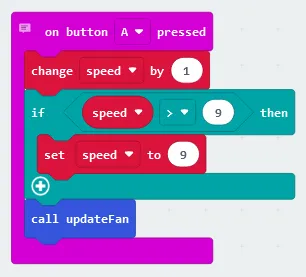
Increasing the speed when the ‘A’ button is pressed:
When increasing the speed we need to check if the new speed level > the max speed level (9), if it is we keep the speed at level 9. Then we can update the fan using the updateFan function. The code for this section will go inside the ‘on button A pressed’ block.
- Determining if the A button is pressed: In the Input tab select “on button A pressed” and drag the block to an empty space on the screen.
- Note: This code block will only run when the A button is pressed
- Increasing the speed: In the variables tab select “change (variable name) by (number)” and change it to “change speed by 1”
- Determining if the new speed level > the max speed level: In the Logic tab select the conditional “if true then” block, then create the comparison block (found in the Logic tab) “0 > 0” and changing it to “speed > 9” (the speed variable can be found in the Variables tab) before placing it inside the if statement so that it reads “if speed > 9 then”.
- Keeping the speed at 9 if speed > 9: Select “set (variable name) to (number)”& change it to “set speed to 9” before placing it underneath the if statement inside the conditional block.
- Updating the fan: In the Functions tab, select “call updateFan” and place the code snippet inside the “on button A pressed” block as last.
Decreasing the speed when the ‘B’ button is pressed:
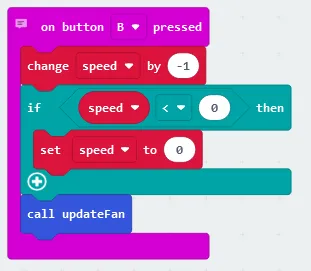
Similar to the code when the A button is pressed, we decrease the speed & check if speed < 0, is so we keep the speed at 0 before updating the fan. The code for this section will go inside the ‘on button B pressed’ block.
- Determining if the B button is pressed: Create an “on button B pressed” block the same way as before but changing the button from A to B, then drag it to an empty space.
- Note: This code block will only run when the B button is pressed
- Decreasing the speed: In the variables tab select “change (variable name) by (number)” and change it to “change speed by -1”
- Determining if the new speed < 0: In the Logic tab select the conditional “if true then” block, then create the comparison block (found in the Logic tab) “0 < 0” and changing it to “speed < 0” (the speed variable can be found in the Variables tab) before placing it inside the if statement so that it reads “if speed < 0 then”.
- Keeping the speed at 0 if speed < 0: Select “set (variable name) to (number)” & change it to “set speed to 0” before placing it underneath the if statement inside the conditional block.
- Updating the fan: In the Functions tab, select “call updateFan”
Continuously calculating the power from the speed level:
We need to continuously update the power variable to accurately reflect the speed level by determining if the speed level is 0, & if not calculating the new power output using: minimum power + (speed x power_step). The code for this section will go inside the ‘forever’ block.
- Creating the conditional block: Select the “if-else” conditional block from the Logic tab.
- Checking if the speed is 0: Create a comparison block “0 = 0” and change it to “speed = 0” (speed can be found in the Variables tab” before placing it inside the if statement.
- Setting the power to 0 if the speed is 0: Select “set (variable name) to 0” from the Variables tab and change it to “set power to 0”, then place the code underneath the if statement inside the conditional block.
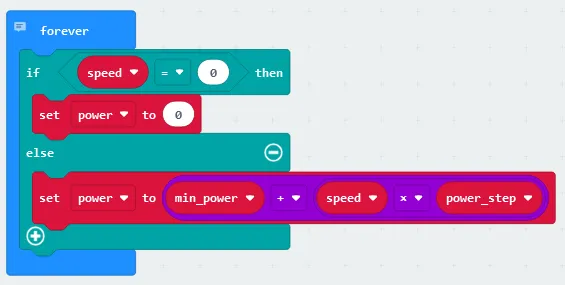
- Recalculating the power: In the math tab select “0 x 0” and change it to “speed x power_step” using the variables in the Variables tab, then select “0 + 0” and change it to “min_power + speed x power_step” by dragging the previous math expression into the code and using the variables in the Variables tab.
- Updating the power variable: Select “set (variable name) to 0” in the Variables tab and change it to “set power to min_power + speed x power_step” by dragging the math equation into the code, then place the code snippet underneath the else statement in the conditional block.
Flashing the code onto the Micro:Bit:
- Make sure the Micro:Bit is connected to the computer
- On the bottom left corner, click the “Download” button and follow the prompts
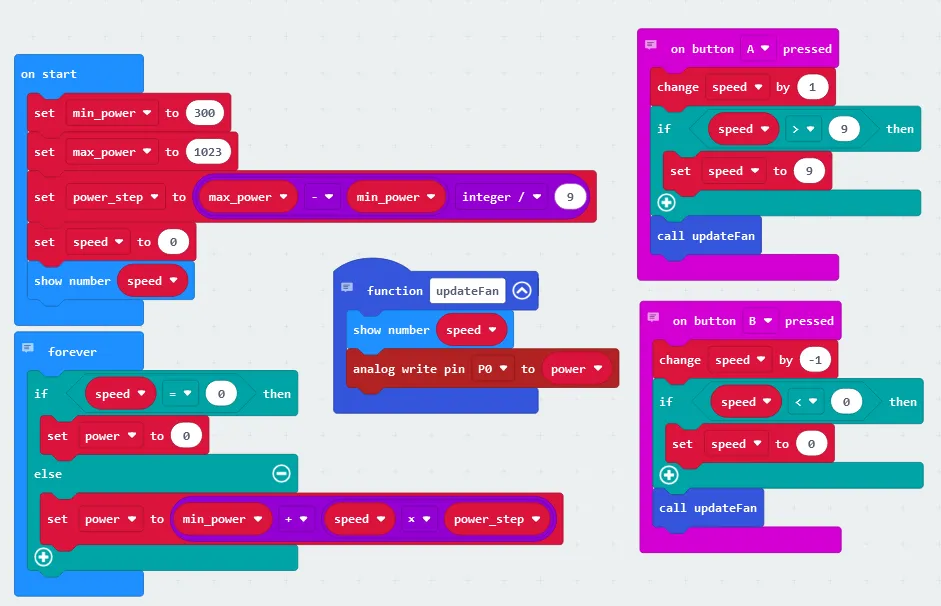
Block Code:
Entire block code for the tutorial:
Python Code:
Entire python code for the tutorial is displayed below:
Full Tutorial Simulation:
Run the code. You will see the motor speed displayed as a number on the microbit display as you interact with the buttons.
Downloadable Content:
Please find this tutorial's python & hex file for microsoft makecode on our GitHub.
Credits:
- Microsoft
- The Micro:bit Community
- The STEM Community