Measuring Particulate Matter Using a PMS5003 Sensor & Arduino UNO
Tutorial Aim:
The goal of this tutorial is to measure & display the number of suspended particles in the air (particle concentration) using a PMS5003 air quality sensor with an Arduino UNO.
Requirements:
This tutorial makes use of the Arduino IDE 2.3
PMS5003 Pin Layout:
Please note that the pins for a PMS5003 are numbered right to left as seen in the image below. In this tutorial we'll be ignoring PMS5003 pins 3 & 6.
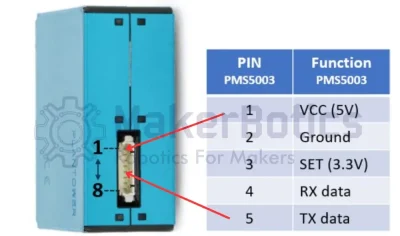
| Pin | Function | Description | Remarks | Arduino Pin | |
|---|---|---|---|---|---|
| 1 | VCC | Supply voltage 5V | 4.5 – 5.5V | 5V | |
| 2 | GND | Ground | GND | ||
| 3 | SET | HIGH or SUSPENDED – work mode LOW – sleep mode | 3.3V logic | N/A | |
| 4 | RXD | UART/TTL data recieve | 3.3V logic | 2 | |
| 5 | TXD | UART/TTL data transmit | 3.3V logic | 3 | |
| 6 | Reset | LOW to reset | 3.3V logic | N/A | |
| 7 | NC | Not connected | N/A | ||
| 8 | NC | Not connected | N/A |
Setup:
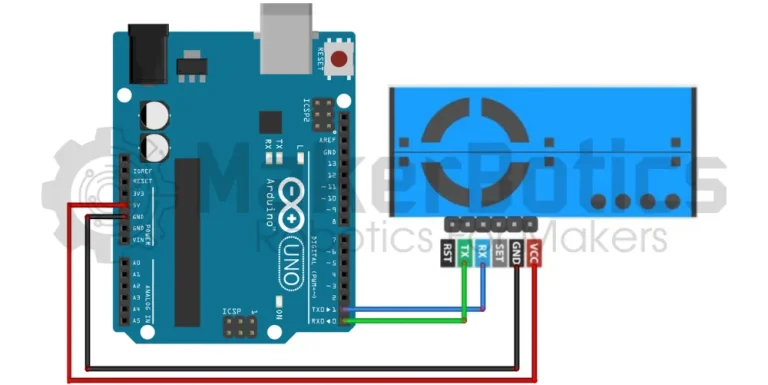
Refer to the image below for wiring.
- Connect the current sensor’s RX pin to pin 2 & TX pin to pin 3 on the Arduino UNO using the FM jumper wires.
- Open Arduino IDE
- Plug in the Arduino UNO to the computer
Code Walk Through:
Libraries:
To access & communicate with the sensor we include the SoftwareSerial library, so that we can use Serial communication with the digital pins. For information about the SoftwareSerial library, please visit the Arduino doc page.
The struct pms5003 is designed to contain all the sensor outputs, as well as the checksum so that we can check if the data was successfully read.
Source Code:
Setting up the serial interface and output readings:
This is the source code for the controller. This section sets up the digital inputs and the output readings. The library used is the Software Serial library.
Reading the sensor:
The PMS5003 sends a 'start byte' 0x42 to the Serial when a new reading is available, so we monitor the PMS5003 Serial for a new reading.
As the data comes in endian, we use a buffer to store & configure the data before copying to our pms5003 data struct. To safeguard against invalid readings, we check the checksum to see if all the data was successfully read.
Initializing the sensor's Serial:
We initialize the Arduino's & sensor's serial so that we can see & display the readings.
Displaying sensor data:
We continuously gather the sensor data and check its validity before displaying the sensor readings.
Particulate Matter Sensor Code:
Entire tutorial code for your reference. Please note that the code is available in the download section.
Output:
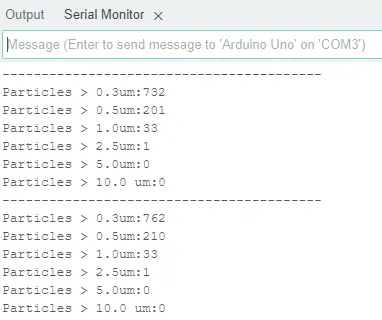
After uploading the code, launch the serial monitor by pressing Shift+M. The output from the sensor will be displayed and the values will settle after approximately 1 minute. If you move the sensor into a dustier environment, you will notice these values will change.
Downloadable Content:
Please find this tutorial's code on our GitHub page.
Credits:
- Maker Community
- The Arduino Community
- The STEM Community