

Interfacing a 2004LCD Screen using a RP2040 and MicroPython
Introduction
This project aims to interface a 2004 LCD screen with a Rapsberry Pi Pico variant model, using MicroPython.
For this project, Thonny will be development environment that MicroPython will be written in. the By the end of this tutorial, you will have a basic understanding of MicroPython and how it can be used to program microcontrollers. This project is great for those looking to start learning MicroPython to program microcontrollers or embedded devices.
Materials:
- RP2040 core board (Raspberry Pi Pico)
- PC with Thonny installed
- Breadboard
- Jumper Cables
- USB-A to USB-C cable to power the Raspberry Pi Pico (with data transfer capability)
- 2004 LCD display module
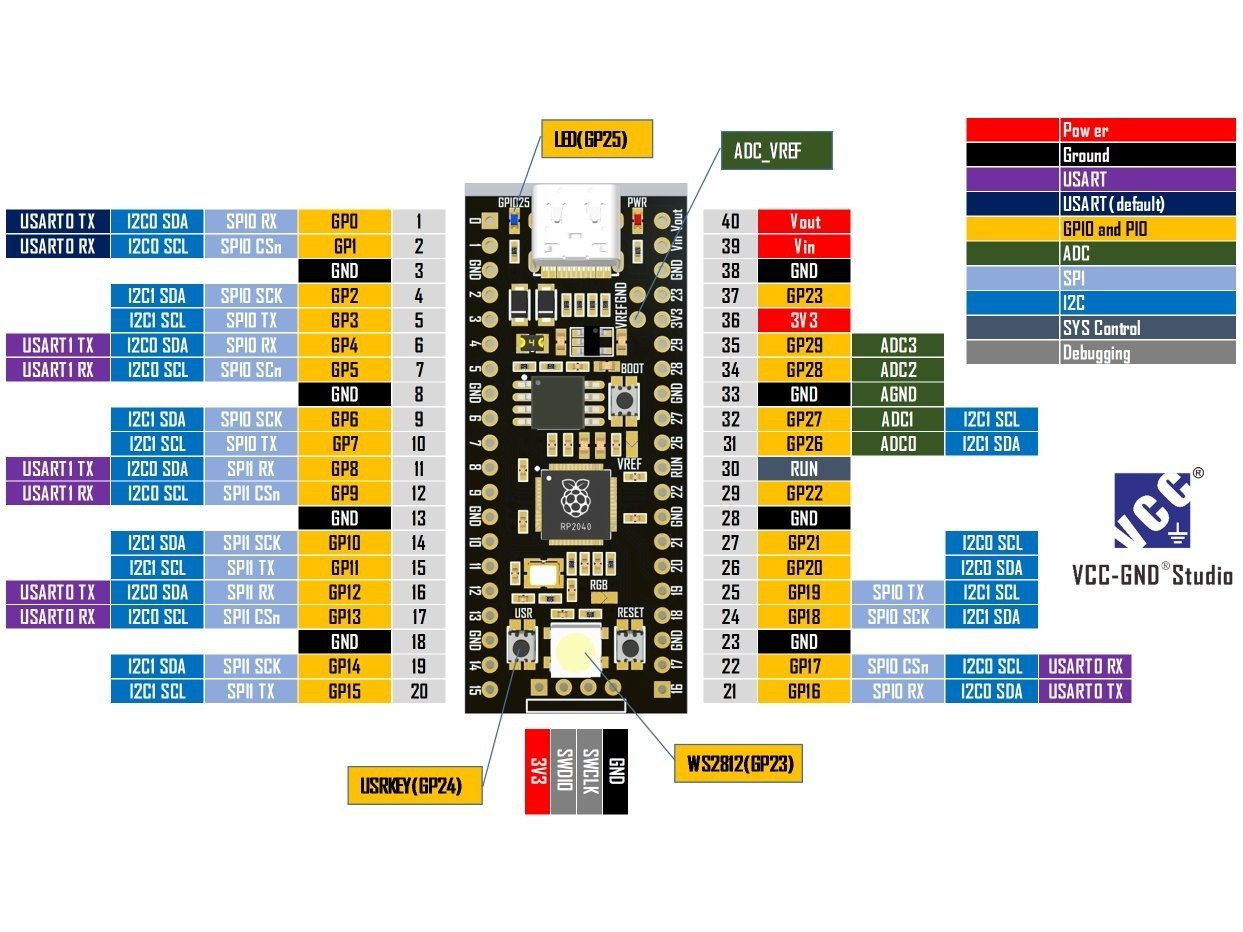
Below is a pin out diagram for the RP2040 board that is being used for this project.
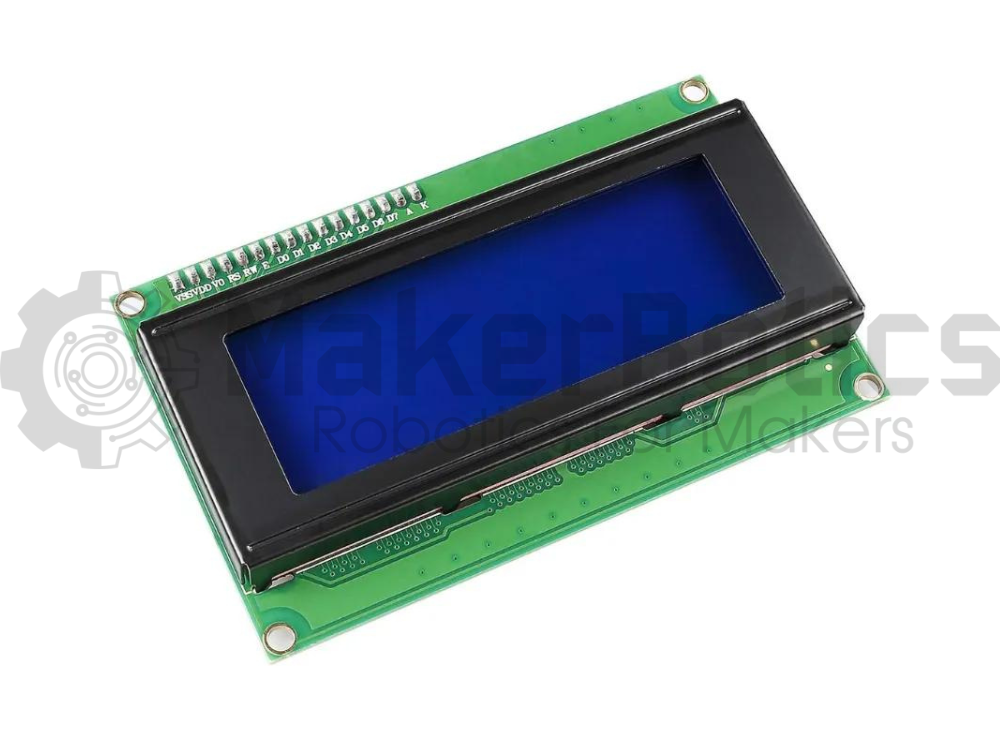
About the 2004 LCD display
The 2004 LCD s a dot matrix module that is designed to display alphanumeric characters and symbols. It has a capacity to display 4 lines of 20 characters. The 2004 LCD display model being used can use the I2C communication protocol, increasing the pin efficiency of the module.
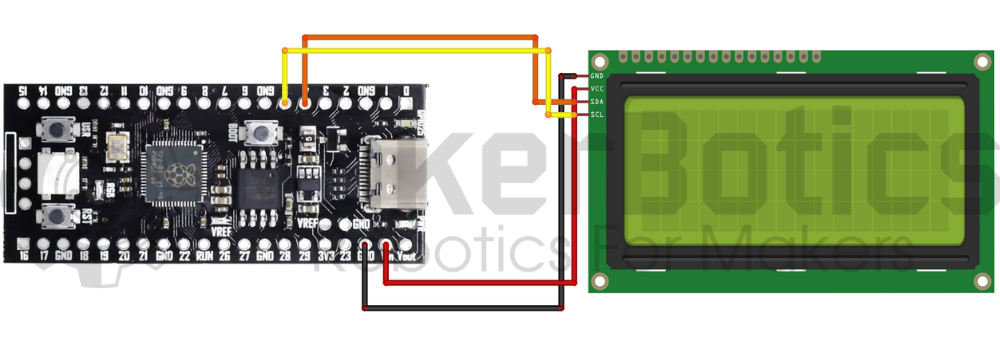
Power Connections:
Wire the LCD’s VCC pin to the Raspberry Pi Pico Vout pin. Connect the GND pin to an available GND pin on the Raspberry Pi Pico.
Communication:
Wire the SCL pin of the LCD to pin 5 (GP5) in the Raspberry Pi Pico. Wire the SDA pin of the LCD to the Raspberry Pi Pico’s pin 4 (GP4).
The image below shows the wiring diagram for the Raspberry Pi Pico and the 2004 LCD screen.
Setup and required libraries:
For this tutorial, the SDA and SCL pins of the LCD can be wired to GPIO pins of your preference, as the pins used can be specified in the MicroPython code. After wiring up the board and LCD and connecting it to the PC, open Thonny. After opening Thonny, change the interpreter on the bottom right hand side to be the Raspberry Pi Pico, using MicroPython.
On your browser, open the following link: https://pypi.org/project/micropython-i2c-lcd/#upload-files-to-board
Download the file, it is a .tar.gz file. Open the lcd_i2c file inside, and open all the .py files using Thonny. Using Thonny, create a new directory in the ‘lib’ file of the Raspberry Pi Pico and name it ‘lcd_i2c’, and save all the .py files of the lcd_i2c file on your PC there. You have essentially added the MicroPython I2C LCD library to the Pico board you are using. If you open the file called ‘lcd_i2c.py’ from the ‘lcd_i2c’ file in the Raspberry Pi Pico, you can view the class called LCD, its properties and functions, all of which you can use once importing the LCD class.
Python Code:
After successfully adding the library into the Raspberry Pi Pico, open a new file using Thonny.
Type out the following code onto the new script:
# Developed by Nisheli Perera on 04/04/2024
# MAKERBOTICS.COM
from machine import I2C, Pin # imports the I2C implementation from the connected machine
from time import sleep
from lcd_i2c import LCD # imports the LCD class from the lcd_i2c library
i2c = I2C(0, sda=Pin(4), scl=Pin(5), freq=400000) # Creates an I2C object with the I2C peripheral, SDA, SCL pins,
# maximum frequency for SCL pin as parameters
I2C_ADDR = i2c.scan()[0] # Scans all addresses between 0x08 and 0x77 inclusive and returns a list
# of those that respond. In this case, we are reading the first item in the list. A device responds if
# it pulls the SDA line low after its address (including a write bit) is sent on the bus.
print(hex(I2C_ADDR))
NUM_ROWS = 4 # initialises the number of rows and columns
NUM_COLS = 16
lcd = LCD(addr=I2C_ADDR, cols=NUM_COLS, rows=NUM_ROWS, i2c=i2c) # creates am LCD object with the
# address, number of rows and columns and the I2C object as parameters
lcd.begin() # initialises the LCD
lcd.set_cursor(0,0) # sets the cursor position
lcd.print(” 2004 LCD”) # prints text onto the LCD
lcd.set_cursor(0,1)
lcd.print(” POWERED BY”)
lcd.set_cursor(0,2)
lcd.print(“MAKERBOTICS PTY LTD”)
lcd.set_cursor(0,3)
lcd.print(” MAKERBOTICS.COM”)
Save this code onto the Raspberry Pi board and run it. The LCD will display some text upon initialisation. You can change the text displayed according to your preference.
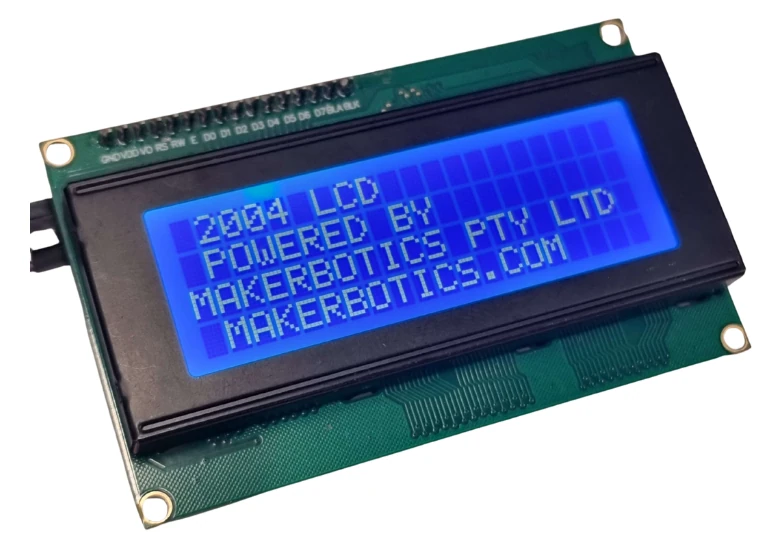
The image below shows the 2004 LCD lit up, displaying the text as programmed in the MicroPython code.
End Result
Running the code with the setup for this project should result in the following output on the LCD screen below.
Downloadable Content
Please find the code for this tutorial on our GitHub page.
Credits:
- Maker Community
- The Raspberry Pi Community
- The STEM Community